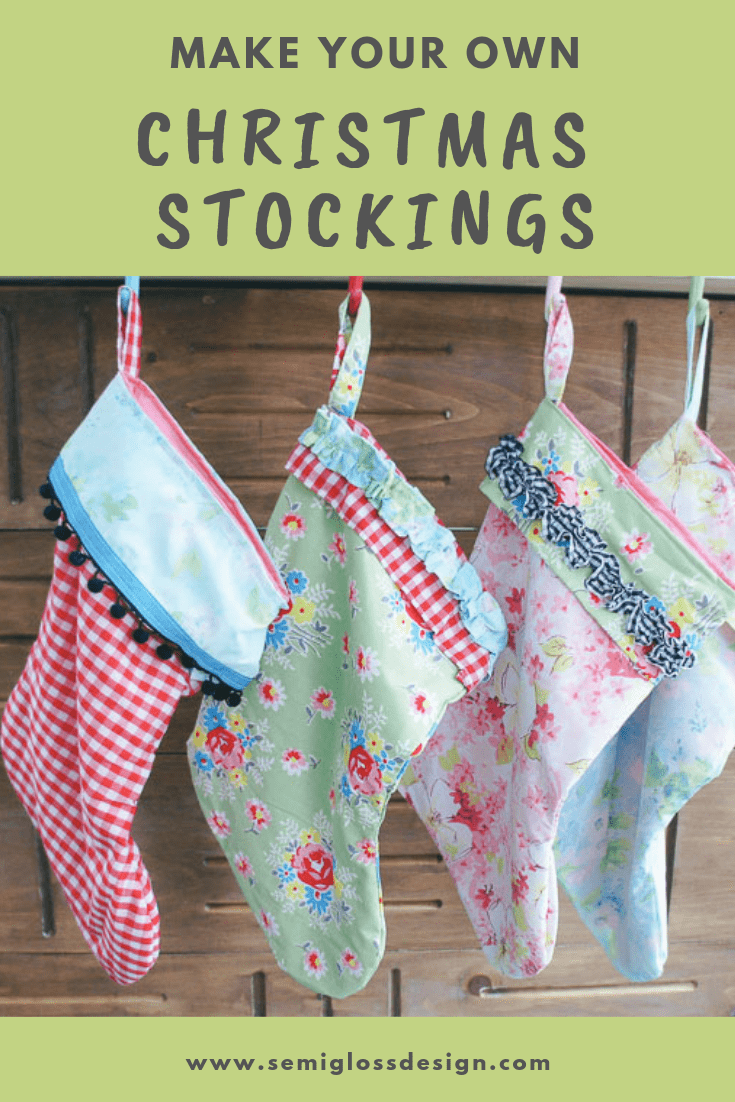
I’ve been wanting to replace our Christmas stockings and tree skirt for years, but I’ve been too cheap and lazy in the past years.
Luckily, my blog requires that I get stuff done, so it’s happening this year. Best reason to blog ever! Our old stockings were the soft furry kind, but I wanted something more us.
So I decided to make some out of vintage sheets and fabric from my stash. This is a great stash buster, by the way. Today I’m sharing how to sew stockings with a cuff.
* I noticed as I was sewing that I’m not real exact with measurements. I’m pretty comfortable with sewing, so I skip or combine a lot of steps. I also skipped ironing, but it makes sewing much easier. This is probably not a good tutorial if you’re new to sewing. Unless you’re a non-perfectionist, like me. I will throw in some lazy girl tips, though.
This post contains affiliate links. By purchasing an item through an affiliate link, I earn a small commission at no extra cost to you.
Gather your fabric*. It should be fabric that you could marry if you could. So you know that fabric that you’ve been hoarding? Use it. I chose a combination of vintage sheets and fabric from my stash. I knew that I wanted the main colors to be pink, aqua, green and red, so I used that as a starting point. Gather your pretty trim too. I used pom pom trim, ribbon, rick rack, and ruffle trim, both store bought and homemade. You don’t have to use crazy patterns and colors like I did. You can choose solids and even omit the trim. That’s the best part of DIY: making it exactly how you want it.
Use an old stocking for a pattern. I folded fabric and cut around our old stockings. Trace it before cutting if it makes you feel better. Just make sure your fabric is folded so that you get 2. Do this again for the inside lining. I used plain colored vintage sheets for this part.
Sew around the edges, leaving the top open. Go slow around the curves if you need to. (Lazy girl tip: The presser foot also doubles as a seam allowance gauge. It’s really close to 1/4″ and that’s all you need.) The floral is the outside and the pink is the lining.
Clip the curved parts. (Lazy girl tip: I just snip, being careful not to clip the seams. It’s not always necessary to clip notches.) Iron it at this point if you want. I obviously didn’t….
Flip the outer fabric inside out. Leave the lining as it is and put it inside the stocking. The wrong sides of the fabric should be together.
Make the stocking loop.Cut a piece of fabric that’s about 7″ x 3″. Fold the edges to the inside and top stitch around the edge. (lazy girl tip: You can iron it to make it easier, but I find it easier to just fold it and sew it. Sewing it flattens it out.)
How to Sew the Cuff for the Stocking
Make the cuff. Using the stocking as a guide, cut a piece of fabric a little longer than needed to wrap around the top of the stocking. This piece was about 8″ high. You want it to be high enough to fold under and sew.
Sew the edge under. Once again, ironing makes this step easier. I just folded it under and then folded it again before sewing.
Add trim to the cuff now. It’s easier to add trim now. I chose a gingham ruffle trim. Picking out trim was the best part!
Fit the cuff around the stocking. Pin if needed to find the precise measurement. Leave space where the ends meet to sew the edges together. Pin it where the edges meet and sew the cuff into a loop.
Pin the cuff to the stocking. Fold the stocking layers in toward each other. Place the cuff in between this stocking sandwich. This will give the stocking a nice finish with all of the seams on the inside. Be sure to pin the stocking loop on the same side as the heel!
Sew the cuff to the stocking. This will be a top stitch, so you can match the thread color or add more trim here if you would like!
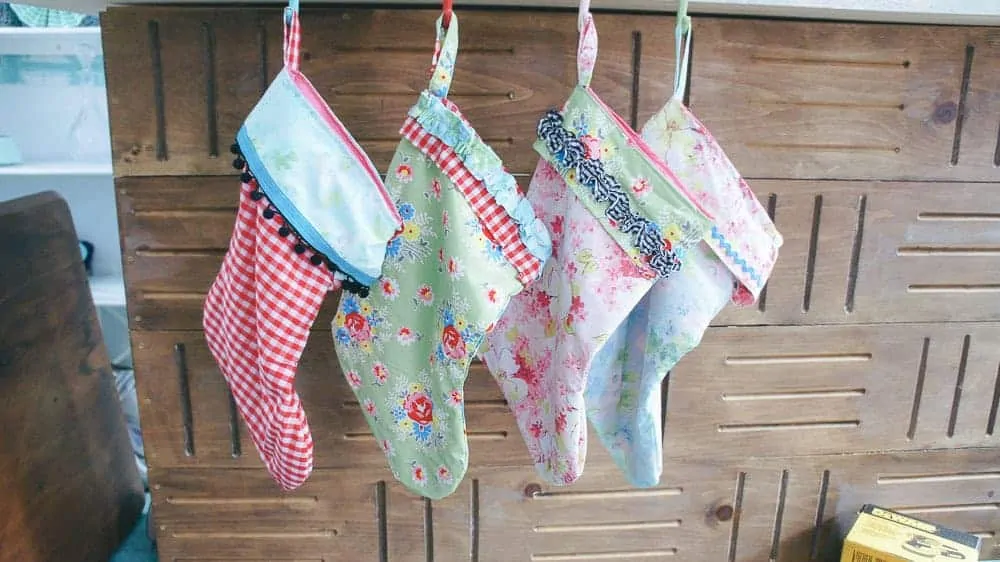
Admire and repeat as many times as needed! The whole process went pretty fast and I was able to get 4 done in a few hours. Although, much of that time went into making fabric decisions.
I’ve since ironed them and they look a lot better. I’m so in love with these stockings. I can’t believe that it’s taken me so long to make my own! Making stockings was actually pretty simple. I hope you enjoyed my Christmas stocking tutorial!
Emy is a vintage obsessed mama of 2 DIYer who loves sharing affordable solutions for common home problems. You don’t need a giant budget to create a lovely home. Read more…


these are so cute! and i am far from perfectionist when it comes to the stockings!
Non-perfectionists unite! 🙂