Make Your Own Letter Stencils for Wood Signs
Make your own stencils for signs with your silhouette.
Don’t you hate it when you see something amazing at a flea market and pass it by because it’s not 100% right. Then you go home and think about it and decide to go back and buy it, but it’s gone.
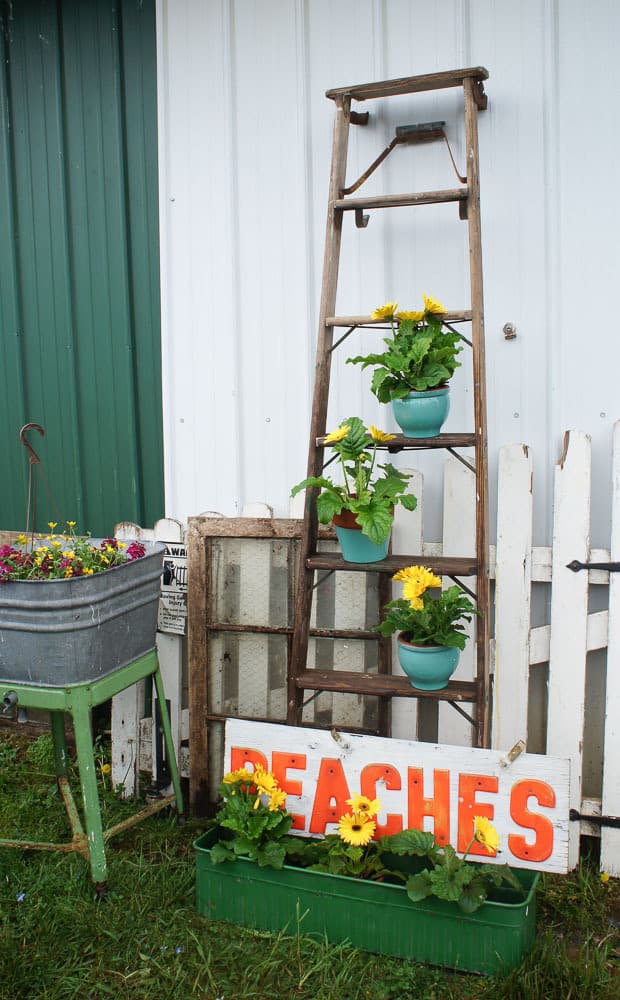
That’s what happened at Lucketts last month. I fell in love with a vintage sign that said “Peaches”, but it wasn’t the right color. So I didn’t buy it and had a lot of regret. When I went back, it had already sold. What’s a girl to do? Make her own of course!! And this sign could be in the perfect colors to go with my decor.
Learn how to make letter stencils for wood signs!
Be sure to check out this post that is even more in-depth about creating stencils using a Silhouette.

DecoArt provided me with paint for this project, but all thoughts and opinions are my own. I would never recommend products that I wouldn’t buy or use on my own. Your support helps me make more projects like this one!
Stenciling is one of my favorite ways to personalize decor. After I bought my Silhouette, I knew that it was the perfect way to create my own stencils, so I’m working my way through different materials to use for stencils.
I have a roll of the Silhouette stencil vinyl, but to be honest, I can’t figure out how to open the package without completely destroying the contents. So I used card stock in my first attempt on my fireplace tile stencil. It worked fine, but it doesn’t hold up well.
Of course, you can always cut more because card stock is cheap. For these letter stencils for wood signs, I tried transparency sheets. Transparency sheets are also incredibly cheap, so they’re a nice option too.
The paint does not destroy the stencil, but they’re a bit flimsy. Looks like I have more experiments to do.
Make Your Own Letter Stencils for Signs
This post contains affiliate links. By purchasing an item through an affiliate link, I earn a small commission at no extra cost to you.
Supplies:
- Scrap wood (or wood cut to the right length)
- White Paint (or primer)
- Paint – Blue | Green
- Transparency Sheets
- Silhouette
- Weeding Tools
- Stencil Brushes
- Paint Brush
- Sander
Prepare Your Wood and Stencils

- Prepare your wood. If you’re not using scrap wood, cut your wood to the right length. I recommend wood at least 6″ deep or larger. Sand it to remove any dirt or splinters. Then paint it white. I used primer because I was already working on something else. This primer provides a nice white background, but you can use any white paint that you want.

- Prepare your letter stencils for wood signs. While the paint is drying, you can work on creating the letters for your stencils. You need to do a bit of simple math here. Divide the number of letters needed by the length of your board. The number will be funky, so round it to .25. I was using 2 different lengths of scrap wood, so I went with a measurement that would work for both. Err on the smaller side so there will be space between the letters.
- Make your stencils in your cutting program. Set your page to 8.5″ x 11. To make all of my letters the same height and width, I created a box in Silhouette. You can type in the exact amount at the top. Then add a letter and enlarge it. I used a sans serif font to create a simple look (Arial Black.) Most likely you will need to enlarge it in an uneven manner to stretch it to fit. This is fine. Old signs were not made with perfect lettering. It adds to the charm. I copied the letter and moved the box.
 Then I just changed the letter and resized it every time. Two letters will fit on a page if you rotate them sideways. Delete the box before sending to cut.
- Some letters need more help. Place rectangles on the letter to divide the voids. (Line them up better than I did!)
 Then select all and use the divide tool in the modify panel.
  Delete the rectangles that were created.
  This creates a more traditional stencil letter. Group the letter shapes together. If this isn’t the look you were going for, it’s easy to fix later.
 - Send to cut. Place your transparency on the mat like usual and load it. I used the cut settings of 1, 6, 19. For more detailed letters, use the double cut.
- Cut the letters apart. I guess I could have created a cut for this, but it was easy to slice the 2 letters apart using scissors.

 Then I just changed the letter and resized it every time. Two letters will fit on a page if you rotate them sideways. Delete the box before sending to cut.
 Then select all and use the divide tool in the modify panel.
  Delete the rectangles that were created.
  This creates a more traditional stencil letter. Group the letter shapes together. If this isn’t the look you were going for, it’s easy to fix later.
Using the Stencils to Make Wood Signs
- Layout your letters on the wood. Place your letters on the wood to figure out spacing. They will overlap a bit because we made them pretty tight.

- Start stenciling your signs. Remove every other letter and start with the first one. Dip your stencil brush in paint and dab most of it off. You want a pretty dry brush. Stenciling wood is very different than stenciling walls though. With walls, you dab the paint on. With wood, you will be brushing it on to get decent coverage. Try not to get the paint under the stencil. Starting on the stencil and working towards the wood helps with this. If you go against the stencil, it will bleed. Not a huge deal, but try to avoid it if possible. When done, peel up your stencil. (Don’t stress about mistakes. They will disappear in a few steps.)

- If your letter needed to be divided in step 4, now is the time to fix it if desired. Grab a small paint brush and paint in the white space. Now it’s gone.
- Skip the next letter and move on the third. This allows the 1st letter to dry. It also helps with spacing. Repeat the stencil steps 7-9 as needed. Keep alternating letters until you get to the end, then start over and paint those middle letters. I didn’t strive for perfect paint coverage because I want my sign to look old.
- Add details if desired. I added a drop shadow for one of my signs. This is easier than it sounds even if you’re not talented with a paintbrush. Use a flat paintbrush in a slightly lighter color than your main color. Then add lines everywhere below the letter. Then I added lines to the right. Then they were angled in the corners.

- Let your sign dry or make another one.
- Sand to distress the sign. This is the time to make all those mistakes disappear. I had fingerprints on mine and smudges. But sanding takes away all of the problem areas. Get the edges well.

- Add a protective top coat if desired. I skipped this step so that my signs would add a bit more in the weather.

- Place where desired and enjoy your sign. I’m using mine to distract from melted siding on my patio. 😉


 When done, peel up your stencil. (Don’t stress about mistakes. They will disappear in a few steps.)


 Then they were angled in the corners.


Now that you know how to make letter stencils for signs, what are you going to make?
You might also like:
Pin for Later!

Emy is a vintage obsessed mama of 2 DIYer who loves sharing affordable solutions for common home problems. You don’t need a giant budget to create a lovely home. Read more…