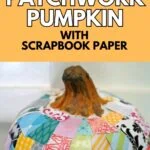
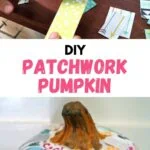
How to Make a Patchwork Decoupage Pumpkin
Learn how to make a patchwork decoupage pumpkin. These cute pumpkins feature a patchwork look with colorful scrapbook paper.
Looking for more Fall decor posts? You might also like this tissue paper pumpkin and these felt pumpkins.

I love making seasonal decor that can be used year after year. Halloween is no exception. No gooey pumpkin guts with this craft!
This fun, decoupage pumpkin features a cozy patchwork pattern that just screams “Fall” to me. Best of all, it’s so easy to find papers to match your decor!
Making a patchwork pumpkin is easy, but it does take some time. I highly recommend finding several good podcasts to listen to or a good TV show to binge-watch while working on this. Set them to play automatically because your hands will be a mess!
How to Make a Patchwork Decoupage Pumpkin
This post contains affiliate links. By purchasing an item through an affiliate link, I earn a small commission at no extra cost to you.
Supplies Needed
- Foam pumpkin
- DecoArt decou-page glue
- Scrapbook paper (the thinner, the better)
- Foam brush
- Scissors
- Paper cutter
- Get a foam pumpkin. I chose a tall one because it seemed to have more flat space.

- Cut your paper into squares and rectangles. I arranged them by color, so I could pick through them more quickly. Don’t go for perfection. A pumpkin is round-ish, so identical shapes will not work!
- If possible, ask someone to cut the pieces smaller when needed. This step is optional, but having a helper is useful, as your hands will soon be covered in glue. Plus, they can keep you entertained.

- Apply the decoupage glue to the pumpkin using the foam brush. For thicker papers, I also added glue to the back of the paper.
- Place the paper on top of it, adding another layer of glue on top. The moisture of the glue helps make the paper softer and form to the pumpkin better.
- Use your fingers where necessary to smooth the paper flat against the pumpkin. Wrinkles will occur at some of the rounder spots, or if the patches are too large.
- Repeat the steps a million more times, slightly overlapping the paper, trying not to put too many of the same color in one area.

- At the top, add smaller pieces of paper, cutting them at an angle if necessary.

- Touch up the stem with craft paint if desired.


Ta da! You have a patchwork decoupage pumpkin. Now you can ogle it and love it.
Additional tips:
- Cut more paper than you think you’ll need and use more patterns than you think. I grew tired of using the same ones over and over.
- Breaking the project into several sessions makes it less overwhelming.
- A patchwork pumpkin should probably be kept indoors to protect it from the elements, unless you add a nice topcoat to it. Even then, I’m not sure I would take the chance.
You might also like:
Pin for Later!


Emy is a vintage obsessed mama of 2 DIYer who loves sharing affordable solutions for common home problems. You don’t need a giant budget to create a lovely home. Read more…