How to Make a Retro DIY Coffee Table
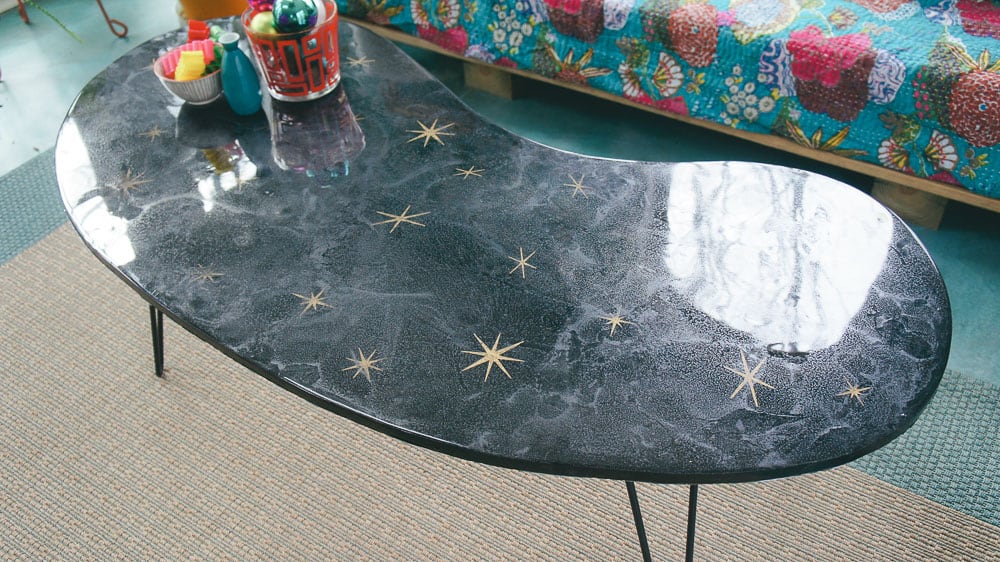
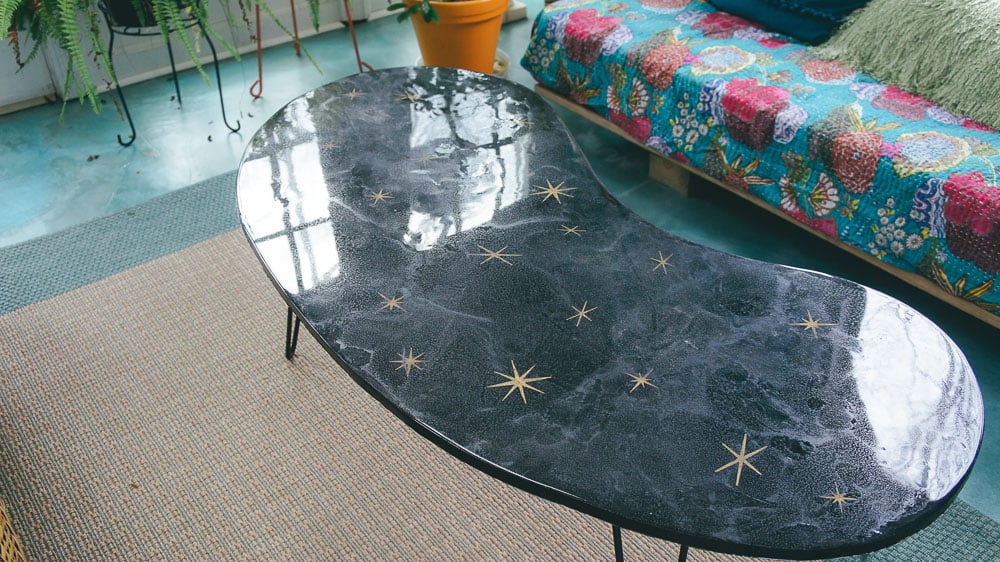
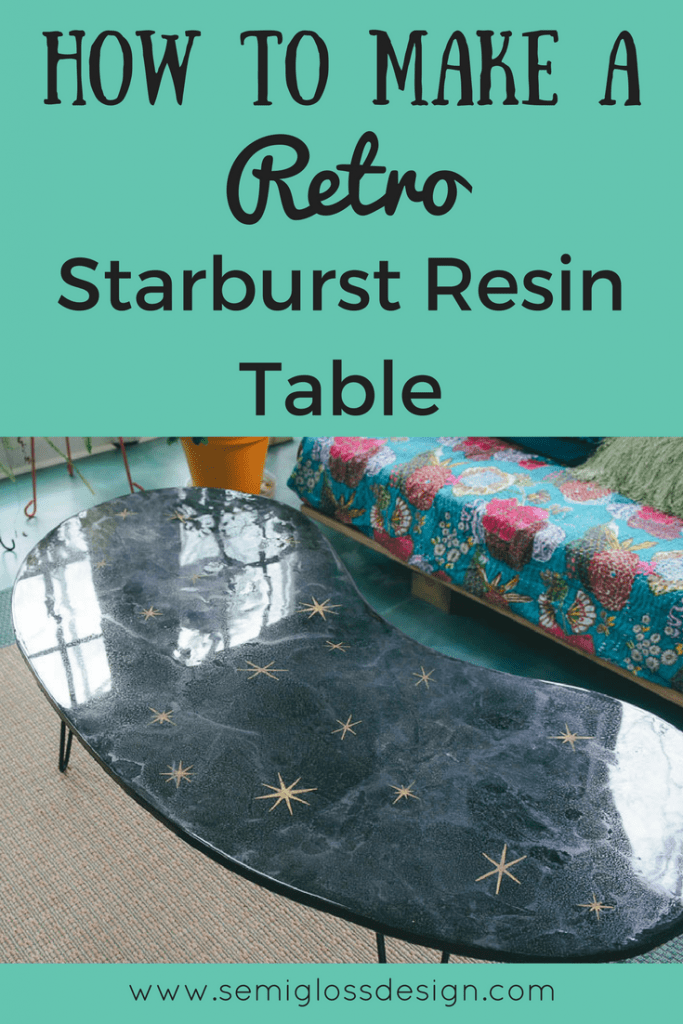
This gorgeous retro DIY coffee table features a kidney bean shape, hairpin legs, starburst stencils and plenty of shine from the glitter and resin top coat.
If you like building, you might also like this DIY console table tutorial.

ETI Envirotex provided me with product in order to complete the themed project.
I was super excited to work with ETI. In my younger years, I used to love using their casting resin to make jewelry.
One coat of ETI EnvironTex lite high gloss finish is the equivalent of 60 coats of varnish. It provides an incredibly durable finish and a high gloss sheen without polishing.
How to Make a DIY Coffee Table
Supplies
This post contains affiliate links. By purchasing an item through an affiliate link, I earn a small commission at no extra cost to you.
- Plywood for table top
- ETI EnvironTex Lite High Gloss Finish Resin
- Vinyl
- Silhouette (for making stencils)
- Cut files
- Extra fine glitter
- 91% Isopropyl alcohol
- Gold leaf paint
- Hairpin legs
- Spray bottles
- Butane torch
- Paint scraper
For my project, I wanted to make a retro DIY coffee table and I knew that ETI EnvironTex lite high gloss finish would be perfect for what I had in mind.
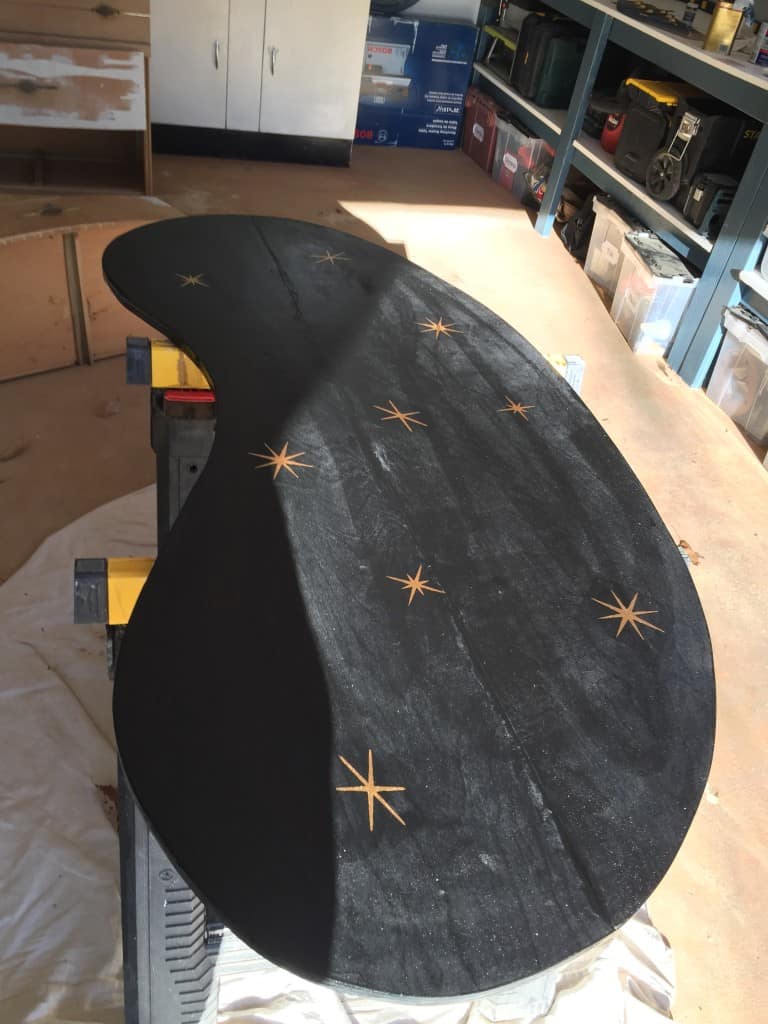
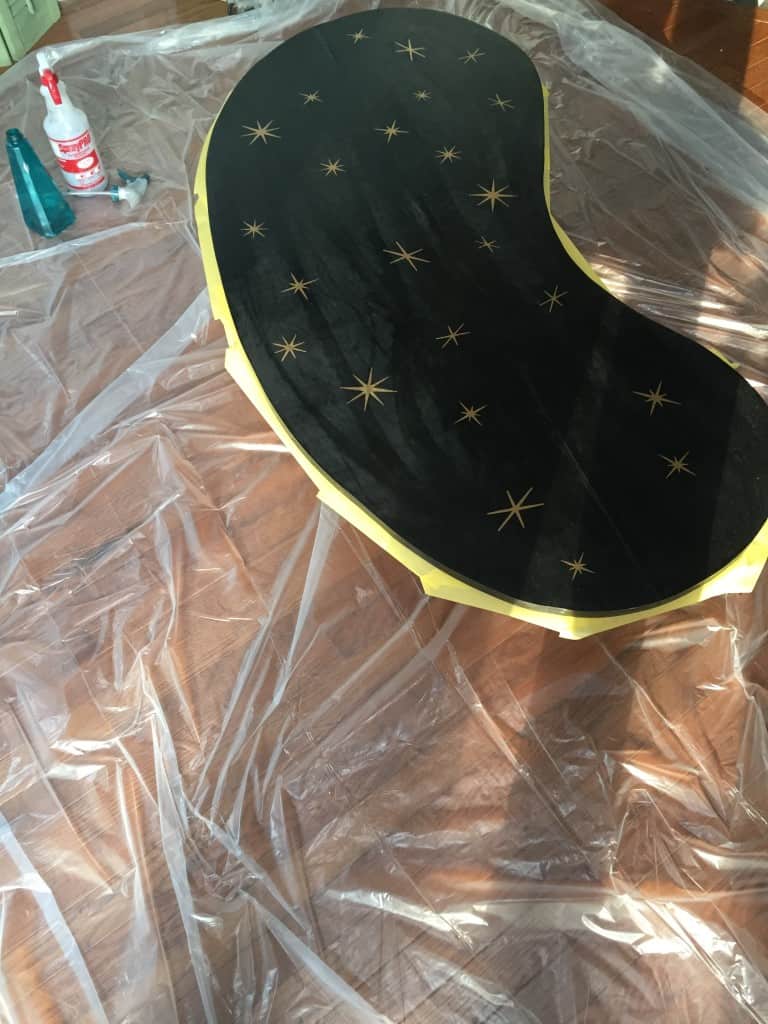
None of my existing furniture inventory would work for something this special, so I made a piece from scratch. I drew out a kidney bean shape on a piece of plywood and had my husband cut it out for me. Then I painted it with black paint.

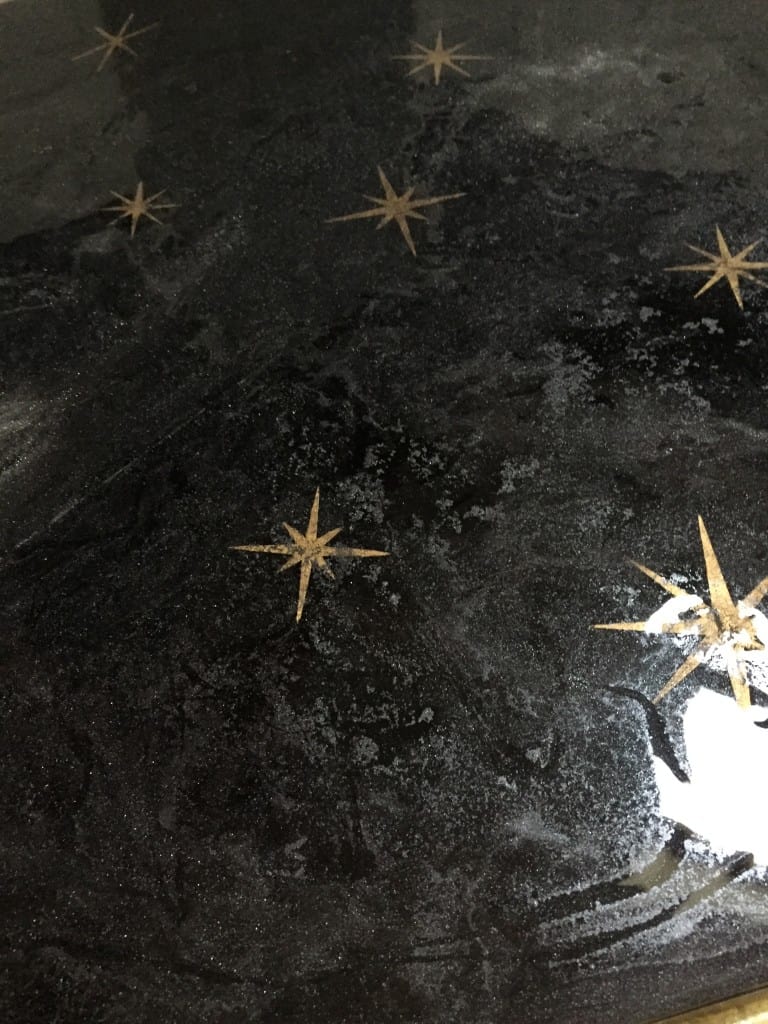
Next, I made vinyl stencils with my Silhouette. I cut 3 different sizes of 3 different starbursts. The stencils were applied randomly to the top once it was the paint was dry.
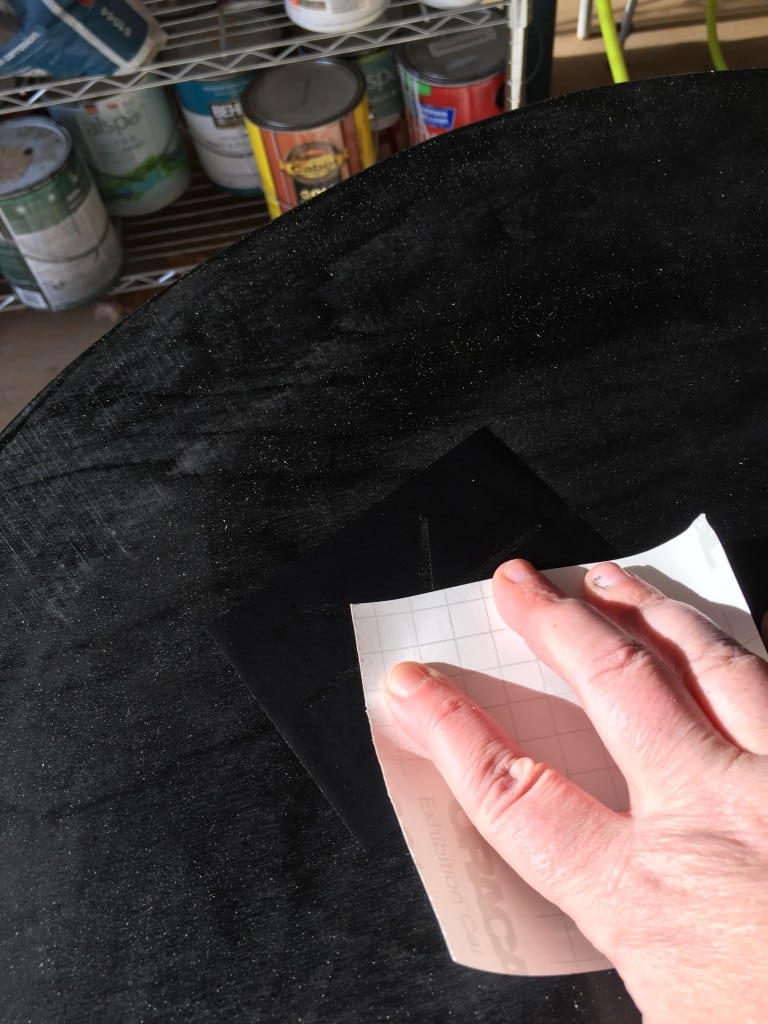
I made sure to rub the edges with a scrap piece of vinyl backing. This seals the edges to decrease the chance of paint seeping through.
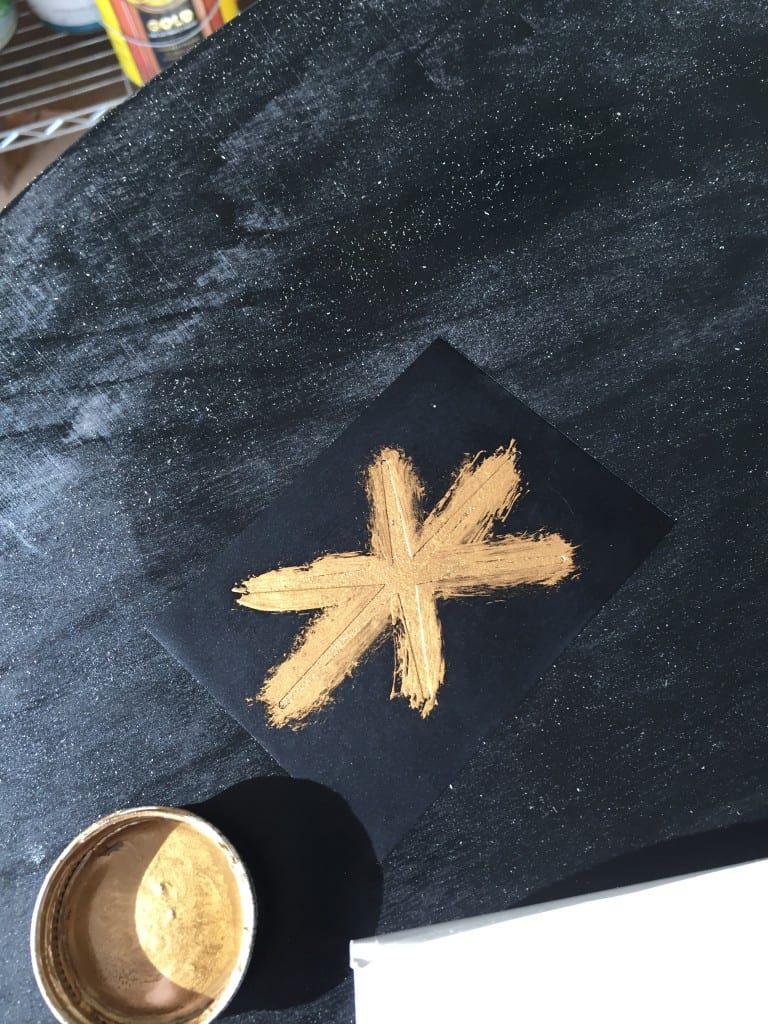
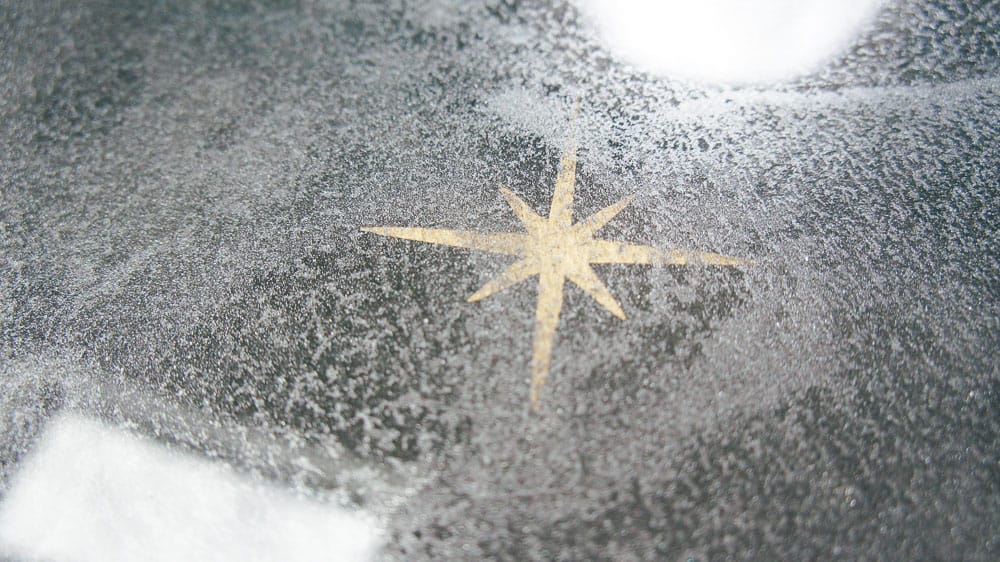
Then I applied gold leaf paint to the stencils. Don’t overload the brush.
The stencils were removed before the paint dried.
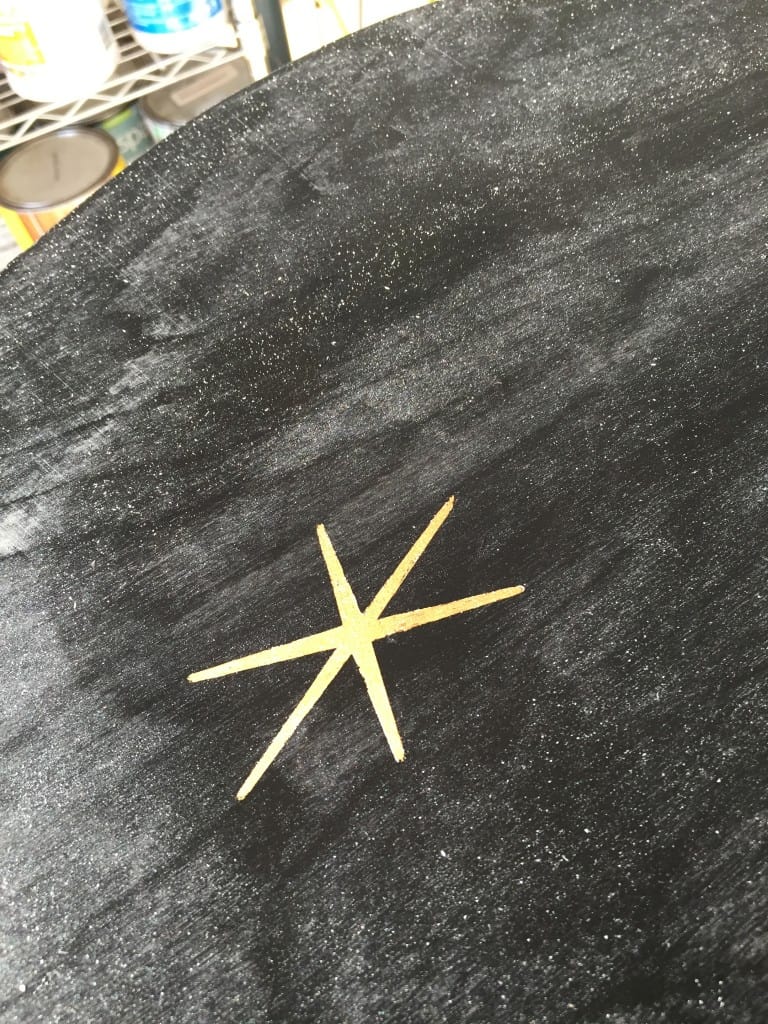
I ended up adding more starbursts in varying sizes.
How to Pour a Resin Top Coat for a Table Top
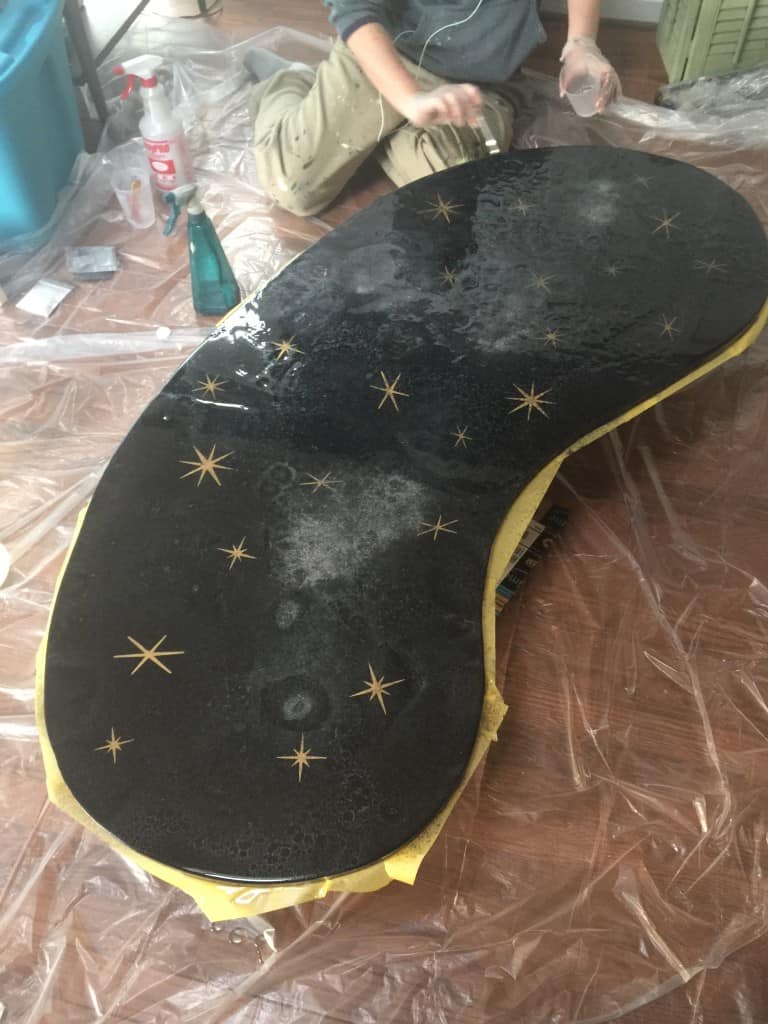
Once they were dry, it was time for the resin. Resin has to be used in temperatures between 60 and 80, so I had to work inside.
To protect my hardwood floors, I laid down a plastic drop cloth. (I normally prefer canvas drop cloths, but with resin, plastic is better because it peels right off when dry.)
The tabletop is propped up on a box to raise it above the surface. You’ll also want gloves to protect your skin. It’s not a huge deal if you get it on your skin, but it’s super sticky. Wash your hands with oil and then soap to clean them!
I also taped off the edges, which I would not do again. (I was able to remove all the dried drips, but cut myself on the sharp edges that the tape created.)
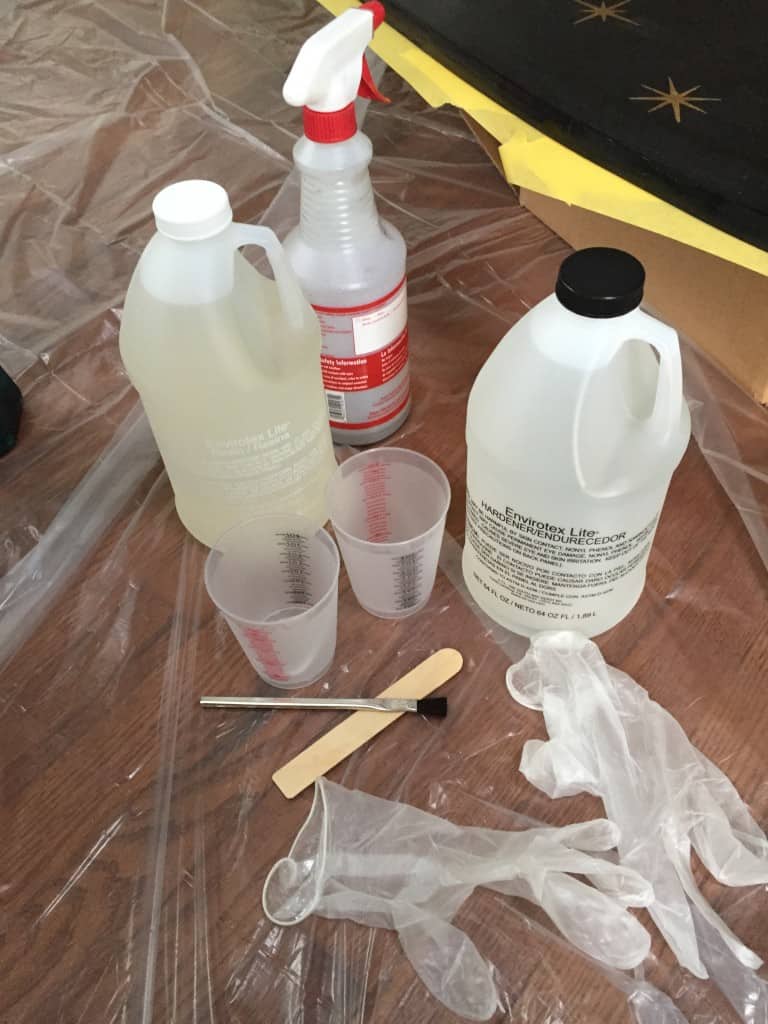
Get everything nearby before you begin. In addition to the resin kit and mixing cups, I also used spray bottles, very fine glitter and 91% isopropyl alcohol. Mix the alcohol and glitter in a spray bottle.
I only used about 1/3 cup of alcohol and a few teaspoons of glitter. It’s not necessary to measure it. Just make sure the glitter is visible in the alcohol.
Having a buddy when mixing resin is helpful. For large projects, I would get new plastic paint mixing buckets from the hardware store. You don’t want to mix giant quantities of resin, but the small cups aren’t enough for a project of this size.
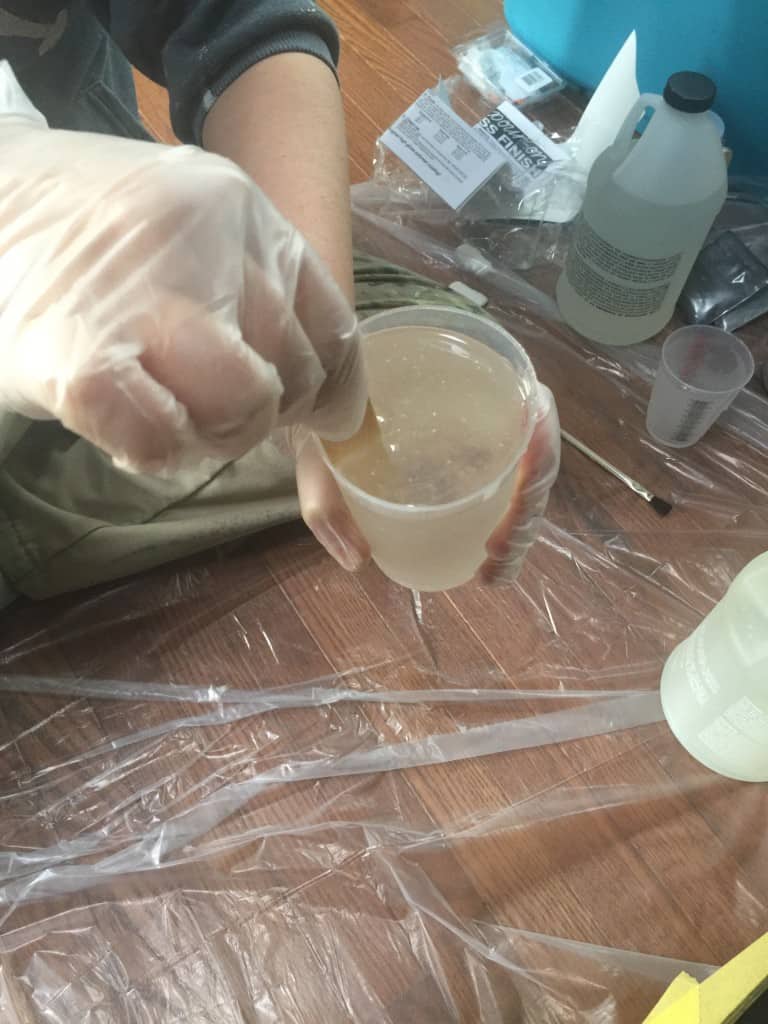
I mixed the first batch, in a 1:1 ratio. It has to be measured and mixed precisely for proper curing.
I had my husband time my stirring for 2 minutes, then we poured it into a clean cup and stirred it for another minute. It’s really cool to watch because little bubbles float out of the mix.
Once it’s mixed, it’s time to pour. I would err on the side of pouring too much. The wooden stir stick was helpful to spread the mixture.
While I spread the first mixture, my husband mixed a 2nd batch. When spreading the mixture, try not to make it too thin.
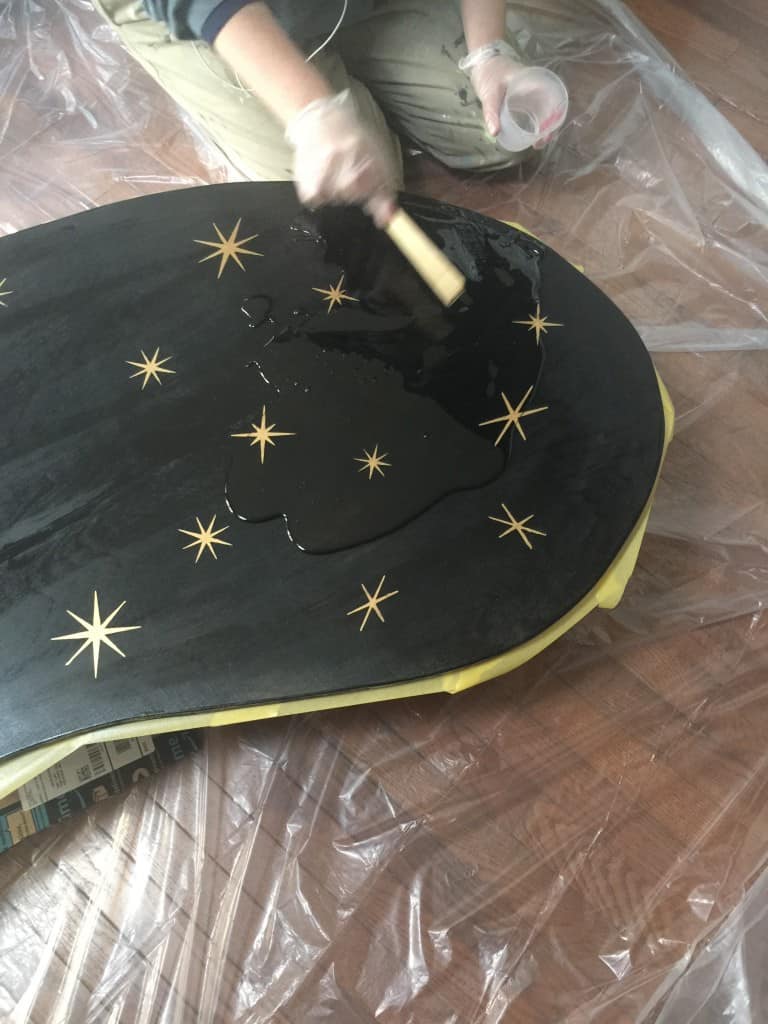
He poured the 2nd batch on.
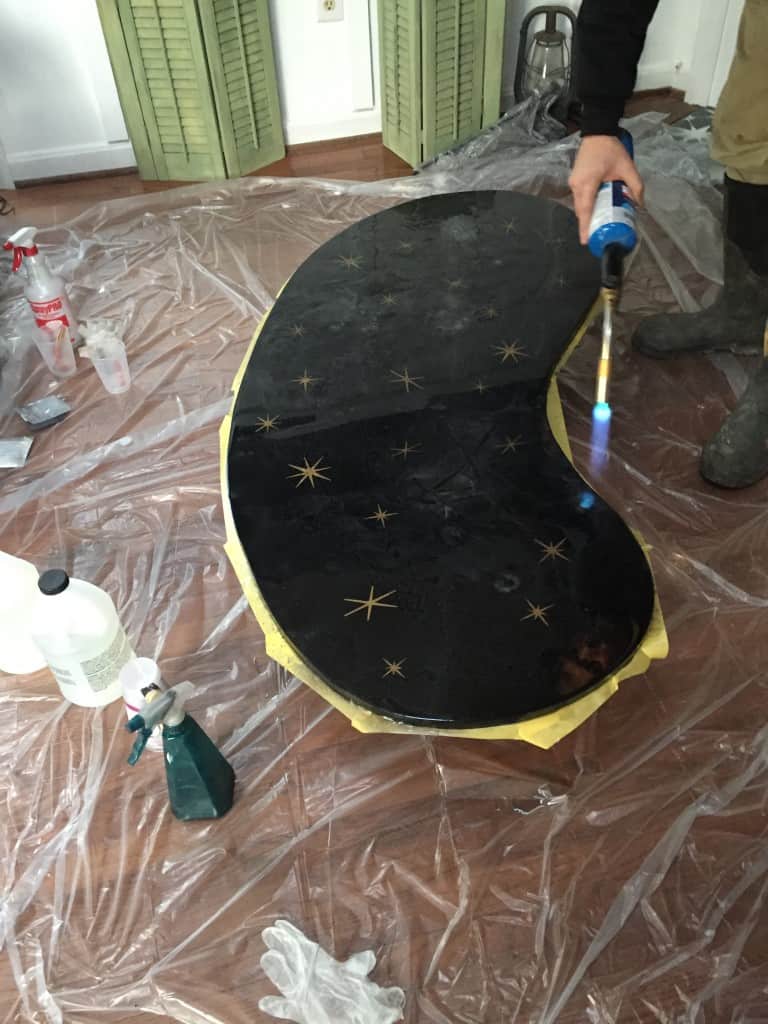
Now comes the magic. It’s time to spray the glitter/alcohol mixture. (If this seems familiar, it’s the same technique that I used in my sunroom countertops.)
Spray the mixture and watch how it changes. You can also just lightly sprinkle the glitter. I ended up using black and silver.
The resin can be worked with for about 20 minutes (shorter if it’s warmer), so you don’t really have to rush it. I used a brush to make sure the edges were coated with resin.
Give the alcohol a while (at least 10 minutes) to evaporate and then apply heat. We used a blowtorch* to pop all of the bubbles. It also moves the glitter mixture around, which is cool to watch.
Always use caution when using a blowtorch or fire.
*You can also use a handheld lighter if a blowtorch scares you. It takes a little longer, but it works. For smaller projects, you can pop each bubble or blow on them to pop them.
Let the table dry. We had to shut the dog out of the room for the day.
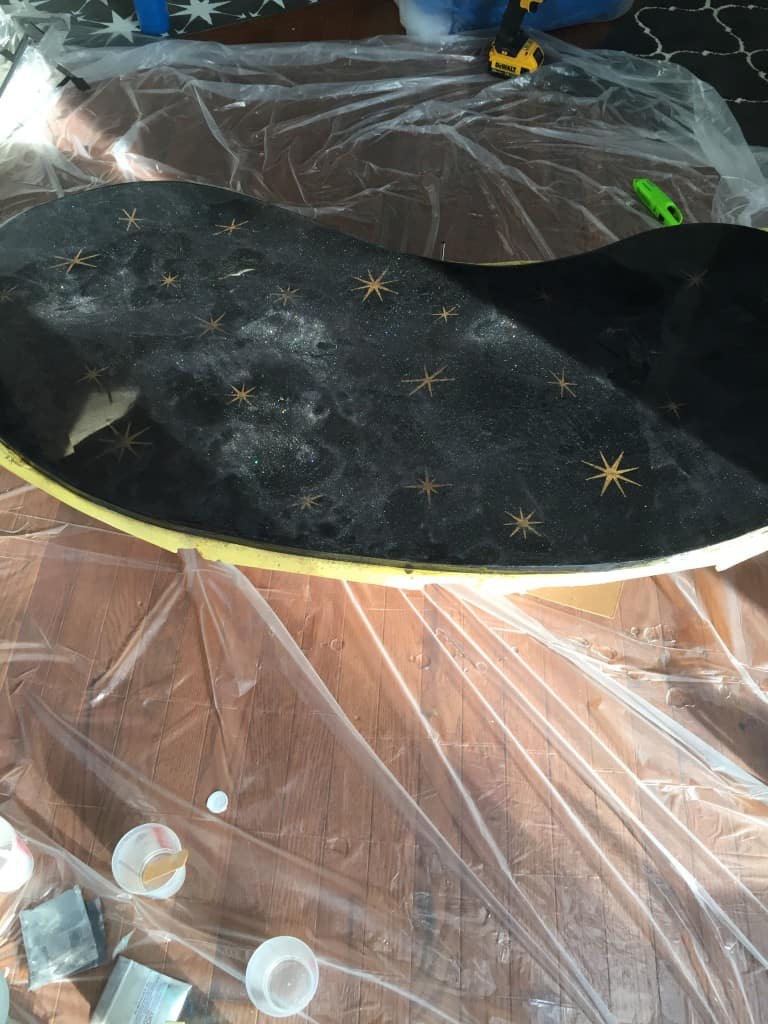
The next day, I ended up adding a 2nd coat because it adds more dimension to the glitter layer. It also evens out any weird spots where I spread it too thin. It self levels, but I still had some low spots due to me messing with it.
Let the table dry for a few days before placing anything on it. That includes flipping it over to put hairpin legs on it. We bought hairpin legs that screwed right into the bottom. Any drips can be sanded off or scraped off using a paint scraper.
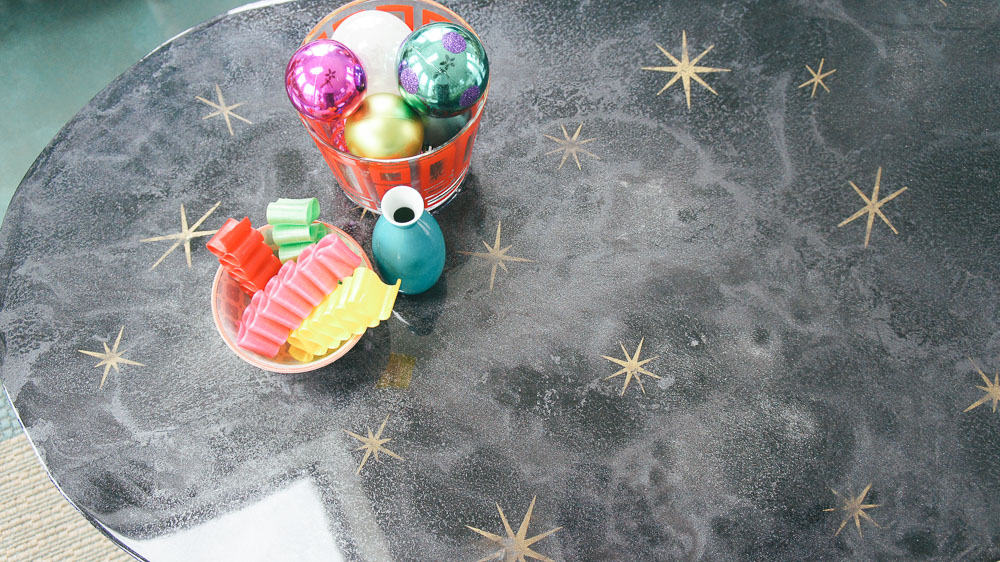
My DIY coffee table is in my sunroom right now, which looks pretty cool with my vintage style Christmas decor. Looks like I need to find a new-to-me vintage sofa now. 😉
As you can tell, the surface is incredibly glossy. Which makes taking photos difficult (especially in a window filled room), but it looks so amazing in person. Ribbon candy, anyone?
The glitter and resin mixture looks so cool over the gold stencils.

I could play with resin and glitter all day.
What do you think of my DIY coffee table?
You might also like:
Pin for Later!

Emy is a vintage obsessed mama of 2 DIYer who loves sharing affordable solutions for common home problems. You don’t need a giant budget to create a lovely home. Read more…

such a fun atomic table!!!!
Thanks Cassie!
Emy I LOVE the starbursts and the glitter!! Such a unique and cool piece!!
Thanks Lisa! Resin was SO much fun!
This is too cool! I love that atomic stars and the kidney bean shape. Wanna make one for me?
Super fun! It looks like your resin was much easier to work with than the one I used for my bathroom vanity. And it’s already got holes and soaks up hair dye! Blarg. I just might have to redo it!!
I love this so much! I was curious, when you did your second layer of resin did you also do the glitter spray mixture or no?
No, it was just a top coat.
Hiii!! Just stumbled across this and going to try it. Do you remember how much resin you used for the whole project? Sorry if its in there and i didnt see it. Trying to do a price analysis before i get started. Also my first resin project which is ambitious but go big or go home!
Hi there, It’s been a while since I made that table, but it looks like I used a cup that was about the size of a red solo cup. It’s a 2 part epoxy so that each part was about half of that. If you buy it at Michaels, use a coupon to save a bit more money on the epoxy. I would also check on line to see who has the best deal. I don’t remember it being crazy expensive though.